How to Label Your Collection
Last week we discussed how museum and archive numbering systems work, and this week we are going to discuss how to label your collection. This is a relatively straightforward process, but there are a few key things to keep in mind as you go. The main rule of thumb is that however you add your catalog number to your object or document, it is done in a non-permanent way. In other words, don’t pull out the Sharpie and start writing all over your things! Sadly, I have seen that happen in museums, and that’s definitely something we want to avoid!
How to Label Your Collection: Writing Directly on the Document Vs. Archival Sleeves
When you’re working with paper or photographic archives there are two schools of thought with regard to how they should be numbered. Some folks will write VERY lightly in pencil the catalog numbers on the bottom right (or left) corner of the document—typically on the back. This way the writing is not visible from the front if it is on display, the writing is reversible because it can be erased, and the size of the writing is very small so that it is not intrusive. This method can work for relatively modern documents. For example, if you have someone’s 1980s era research notes that you are adding into your collection you may choose to number it that way. For Civil War era paper materials (including CDVs), I would hesitate to use this method, simply because the documents are often very fragile—and in some cases disintegrating—to the point that should that number ever be erased, doing so would likely destroy the paper. The advantage of lightly writing the number in pencil on the document directly ensures that it will never be separated from the number. If using this method, do not use a mechanical pencil as it is often too sharp and can damage old paper or leave an imprint that shows through the front. Use a 2B soft leaded pencil, sharpen it, and then use a piece of scratch paper to soften the tip of the lead so that it is a bit duller. The below video shows how to mark papers, photographs, and books using this method.
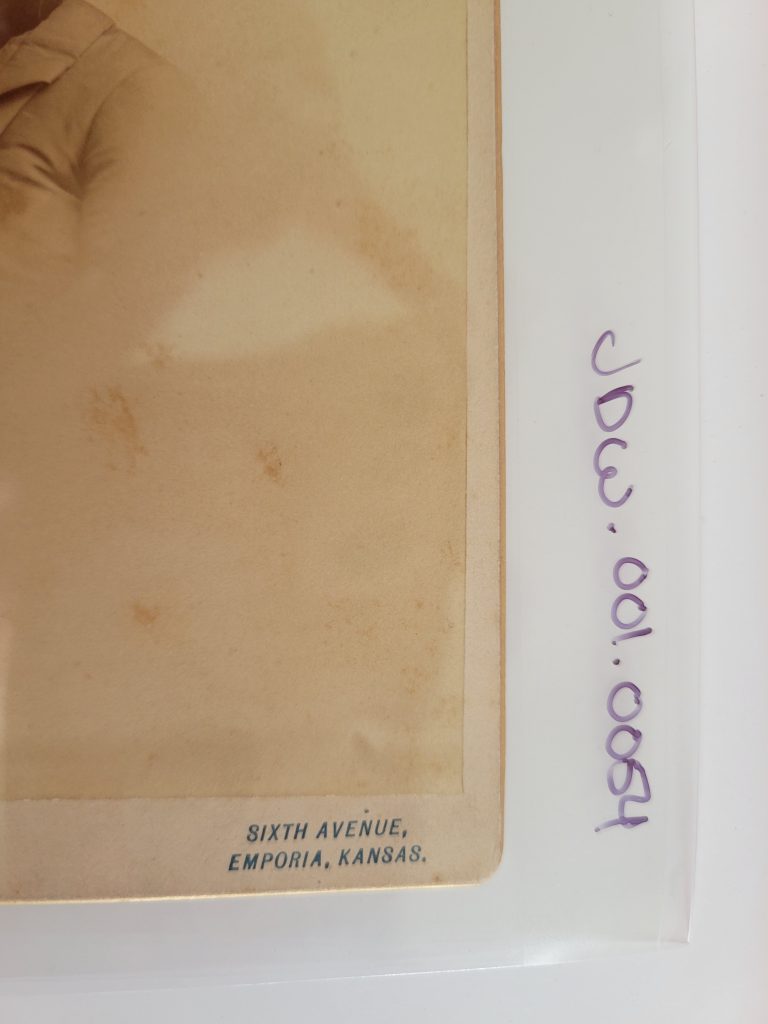
Personally, the method I prefer (and the one we use at the Research Arsenal) is to write the number on the clear archival sleeve that protects the document. This ensures that the document is not directly affected by the writing. Should the number ever need to be changed it only needs to be placed in a new sleeve with the correct number. You can use a fine point Sharpie to write on the sleeve and the ink will not smear. Be sure it has dried completely before you place a document inside just in case the document touches the ink.
If your documents are digitized (which they all should be eventually) then there will be minimal need to handle the original documents in the future. If you want to read through them or look up something with them, you only need to use the digital scan, rather than handling the original document which can further degrade it.
How to Label Your Collection: Tagging Objects
In this case, I am going to include tintypes (in cases) and ambrotypes as objects as opposed to archives simply because they are not made of paper material. Anything not made of paper will typically fall into the object category and use tags. Tintype photos not in cases can be safely stored in archival sleeves and can be numbered using the above method of numbering the sleeve.
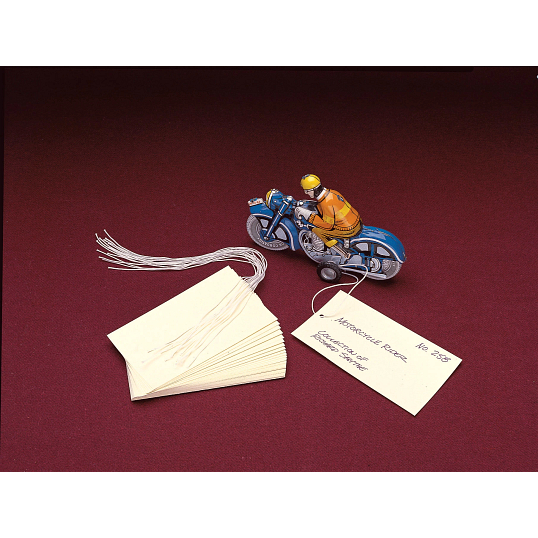
Objects will need an archival tag which consists of a small square of archival cardstock strung on a loop of archival string. These come in all sorts of sizes and shapes and can be used on a variety of objects. They are also easily removed if need be and can be arranged in such a way that they are not obtrusive if the object is on exhibit.
To use a tag, you will want to write the catalog number on the tag and if there is room, a one- or two-word description. A tag for a M1851 Colt Navy Revolver might look like “2025.002.0014 M1851 Colt Navy Revolver” and that’s it. You can shorten or lengthen in to your preference, the intention being that it allows you to easily identify what item the tag goes with, should it become separated, and also so that you can easily identify what the object is without needing to look it up. To write on the tags you can use the fine point Sharpie again.
You’ll want to loop the tag around the object in some fashion so that it is unlikely to fall off. In the above example of the Colt Navy Revolver, you could loop it around the trigger guard. For objects that don’t have an obvious way to loop the tag, you’ll have to get a bit more creative. You can tuck the tag inside the case of a tintype, loop it around a buttonhole, tuck it in the band of a hat, etc. It will vary from object to object. No matter what the object is and how difficult it is to find a way to secure the tag, do NOT tape, glue, or otherwise use adhesives to attach it. If you are working with small objects, maybe say, Minie balls, you may wish to keep them in a small Riker mount and then tag the mount or keep them in a small archival box with the tag inside the box. The most important thing to consider in all of this is that what we are doing does not have any permanent effect on the object.
I’ll leave you with this link to some “horror stories” of museum numbering fiascos that you may find entertaining. Whatever you do, don’t do what these folks did! https://world.museumsprojekte.de/how-not-to-number-objects/
